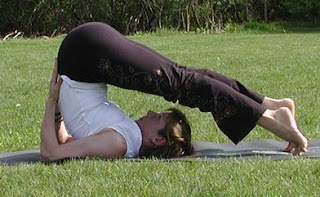
PLOW POSE (halasana)
Benefits
• Improves digestion
• Stretches the shoulders and improves flexibility of spine
• Calms the brain and nervous system and helps relieve stress and fatigue
• Massages and stimulates the thyroid gland
• Massages abdominal organs and improves digestion
• Helps relieve the symptoms of menopause
• Flushes mucous from the lungs
Contra-indications• Neck or back problems
• Eye or inner ear infection
• Heavy period of menstruation
• High blood pressure
• Asthma
•
• Pregnancy
• Diarrhea
• Halasana is considered an intermediate to advanced posture. If you are new to Yoga, we recommend you start with the beginner variations suggested at the end and then gradually work your way towards the full variation
Step by Step
(hah-LAHS-anna)
hala = plow
1. Since Halasana is commonly done after Salamba Sarvangasana (Supported Shoulderstand), these instructions will begin from there. Having a support under your shoulders can create more freedom and ease for your neck in Halasana. Therefore, fold and stack a couple of firm blankets large enough to support the width and depth of your shoulders. A sticky mat then placed over the blankets will help the upper arms stay in place while inverting. As you lie on the blanket support, position your shoulders on the blankets so your neck and head drape off the edge and rest on the floor (your 7th cervical vertebra, or the largest boney point on the back of the neck, should still be on the blankets)
2. From Salamba Sarvangasana, support your lower back with both palms as you slowly lower your legs and feet over the head towards the floor. Continue to draw the elbows toward each other and feel the back of your upper arms on the blanket. Feel little or no weight on the lower neck and maintain ease and space in the mid and upper neck region. Maintain your pelvis over your shoulders listening to how the neck and lower spine feel. Move your chin away from your sternum as you soften the throat and facial muscles.
3. If you feel tension in the legs or low back when lowering the legs and feet, bend the knees slightly. If there is ease in the legs, spine, and neck, let the toes touch the floor, and then move the torso more perpendicular to the floor. Slowly extend the legs fully and allow the top thighs and tailbone to move toward the ceiling.
4. The back of the neck and spine should never feel no pressure or tension. To avoid over stretching the neck, the tops of the shoulders should push down into the blanket support, and the shoulders should be able to lift slightly toward the ears to keep the back of the neck and throat free and soft. Beginners should stay in the pose for about 30 seconds. Gradually increase the length of time within this pose until it is comfortable to stay for 5 minutes at a time
5. To exit the pose, exhale and slowly bend your knees letting your thighs drape over the shoulders. Contract abdominal muscles to keep the pelvis over the shoulders. Place your arms on the mat shoulder width apart. Keeping your head on the ground and knees bent, slowly and carefully roll your back onto the ground. Once your hips rest on the mat, hug your knees into your chest and rock side to side. Return to center and rest for several seconds
Modifications•
Beginners may find difficulty in lowering the legs and feet towards the floor. You can perform a less deep variation by lowering the feet onto a chair and then slowly extending the legs. You will need to experiment with the right distance of the chair
• To deepen the pose, press the arms into the mat shoulder width apart opposite direction to the legs. Lift more onto the top of the shoulders by drawing shoulder blades inwards, then respread the shoulder blades as the outer arms press into the mat
